If you love your fortwo and are a fan of music then I bet you will be kicking yourself for not going for a sound upgrade when you bought the car. The standard speakers cannot cope with anything with a bass line. I was driving around with the bass level on -6 for ages to try and avoid speaker distortion. Getting smart to retro-fit the sound upgrade will set you back a small fortune. This guide will explain how to install it yourself.
This installation guide is aimed for all RHD Fortwos.
Parts needed:

Dash removal... Yes, I’m afraid so – the whole dash has to come off.
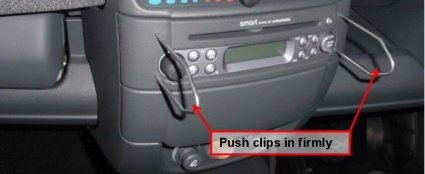
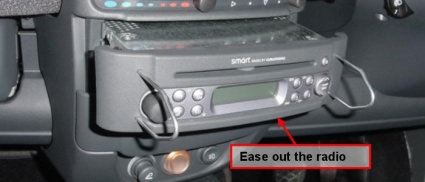
Start with the radio. Push the clips in the holes so that the radio becomes free.
Unplug the two connectors and put the radio somewhere safely out of the car.
***Make sure that you have the keycode for the radio***
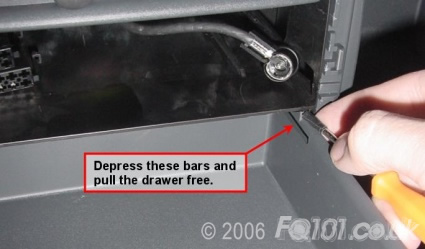
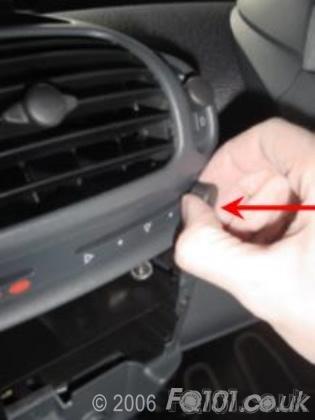
Time to tackle the drawer. Pull it out as far as it will go. It is retained by the two bars at the top left and right. Use your new padded screwdriver to gently push these bars down whilst you pull the drawer with your other hand.
Remove the ashtray by removing the screw cap on the left and loosen the bolt with the 50 pence piece. Using a screwdriver will chew up the bolt head – it is really soft. Open the ashtray and loosen the bolt at the back with the TX30 screwdriver. The ashtray will now come away from the centre column. If you have extra units below, start at the bottom and work up as each one slots together.
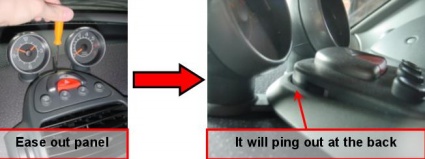
Use a padded screwdriver to release the top of the centre console by gently levering it up from the back as shown. Be careful, you don’t want to chew up the plastic. It will look awful if you do. Unplug clock and panel connectors
Pull out all of the fan and heater control levers. Some of them will be a bit tough but just be firm, they will come out.
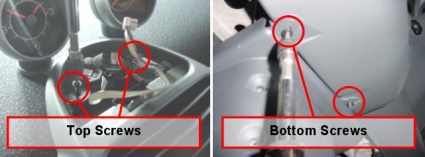
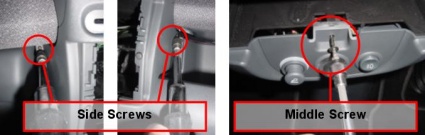
Now, loosen all seven screws holding the centre console in place with a TX10 screwdriver. Two are at the top, two at the bottom, two at the sides and one in the middle.
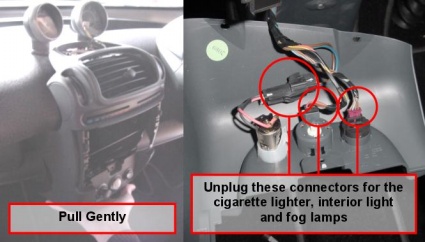
Free the centre console by pulling it forward from the bottom. Be careful as all cigarette lighter, interior light, and fog lamp buttons are still connected. Take care when removing the centre console, don’t strain or force anything it will come away quite easily. Unplug the cigarette lighter etc. and remove the whole centre console.
Centre console removal is now complete.
Remove all 4 Torx screws under the steering wheel with a TX10 screwdriver. This is where you will find you need a long screwdriver.

You will now be able to lift the top section off the speedo. Squeeze the edges of the rev counter connector (green one) in order to unplug it. The speedo cable has a lever which you need to fold over before you can unplug it.

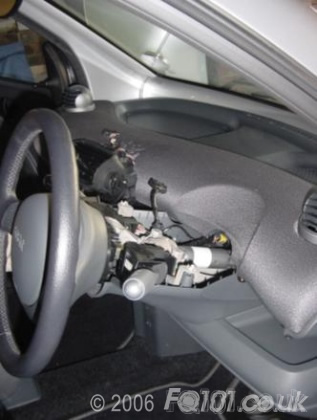
This should now be where you are:
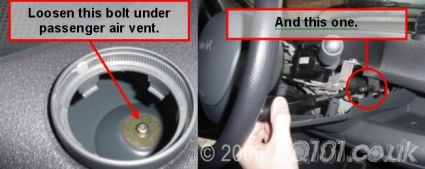
Pull off the passenger air vent and loosen the bolt that you can see there with the TX30 screwdriver. Over where the speedo was, you will see a small TX10 screw. Loosen this as well.
Now take a deep breath…
Hold the dashboard at each end (you might need someone to help you do this). Lift the dash up slightly at the front and then pull it away from the windscreen. You will hear it ping of its clips. Don’t remove it just yet!
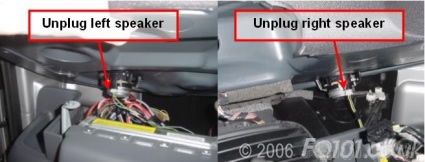
If your fortwo still has the original speakers, you need to unplug these first.
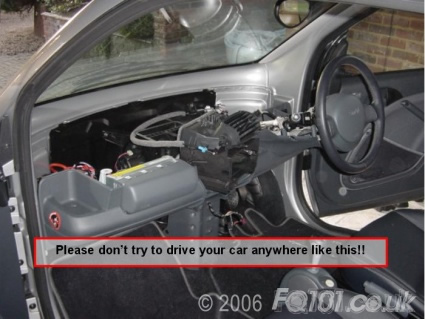
Now you can remove the dashboard from the car making sure you do not scuff anything.
Stand back and look what you have done to your car! You have now completed the dashboard removal. Well done!
Speaker installation:
Now that you have taken your car to bits, you will be itching to justify it by putting something back. On the passenger side where the SAM unit is, gently push the cables downward to check that don’t snag on anything and will compress safely when you put the speaker bin in.
Now place the bins in and screw them to the holes provided with the TX15 bolts. Put the M6 nut on the stud at the back. Make sure everything is tight. You don’t want any rattles!
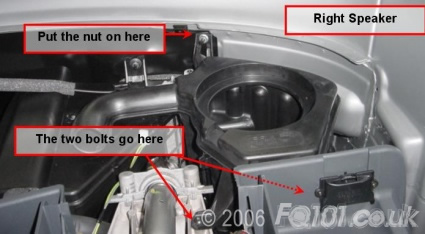
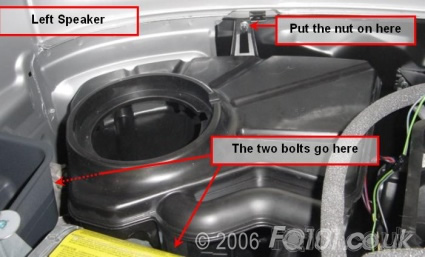
Wire up the speakers, place them in the bins with the cable running through the ducts provided. Screw the speakers in place using ALL the screws provided. You want to make sure that they are firmly in place – the last thing you want to do is go through all this again in order to fix a rattle!
Run the cables back to where the radio usually goes. In this case, I cut the existing cables and crimped the new speaker cables to the connector.
Plug the radio back in, enter the keycode and test the speakers. Turn them up nice and loud and check for rattles. When you are happy, turn off and unplug the radio.

Putting it all back together...
After the anxiety of seeing your car in bits, you will now have regained hope on hearing the potential of your in car entertainment by testing the speakers. However, there is one last hurdle to get over before you are on the final straight of the project. Getting the dashboard back in…
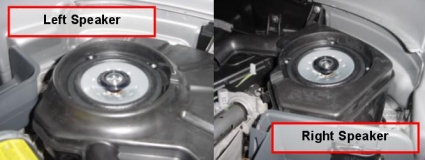
Make sure that you remove the old speakers fixed on the underside first. On inspection of the speakers, you will wonder how you ever got any sound out of them at all – they are rather basic.
At the back of the dashboard, you will notice 3 moulded sections. These correspond with 3 clips just below the windscreen.
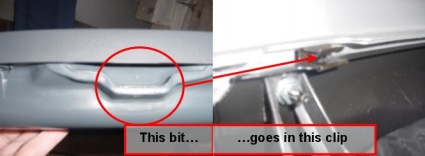
If you can find someone to help you do this bit then it makes life a lot easier. Line the dashboard up with the first clip and work from one side to the other whilst your assistant makes sure that it stays in the previous clip. When you get to the last one, the dashboard will fall into place.
After taking the dash apart, putting it back together will be a piece of cake. When you plug the speedo back in, you should notice the lights flash as the speedo reboots. Remember to be careful when putting all the parts back together.
Testing...
As many things were disrupted during this installation, you need to check the following so as to make sure that you put it all back together okay.
Turn on the ignition and turn on the side lights. Check that:
- The speedo is displaying all the necessary lights and that the mileage can be seen in the LCD display at the bottom.
- The rev counter is working (should be around 1).
- The clock is working (you will need to correct it).
- The fan is working.
- Everything that lights up when the sidelights are on, does.
- And finally, the radio works with your new speakers.
If all is well then all that is left to do is find your assistant, two glasses, a bottle of wine and celebrate a successful installation whilst listening to some choice music through your new speakers!